Photographing a Bobcat!

Last summer I was contacted by my alma mater Ohio University. They hired me to photograph a fellow Bobcat in my area who had been chosen to make a local TedTalk about her passion for running. Passion to run a half marathon in all 50 states before reaching age 50, to be exact.

Woah!

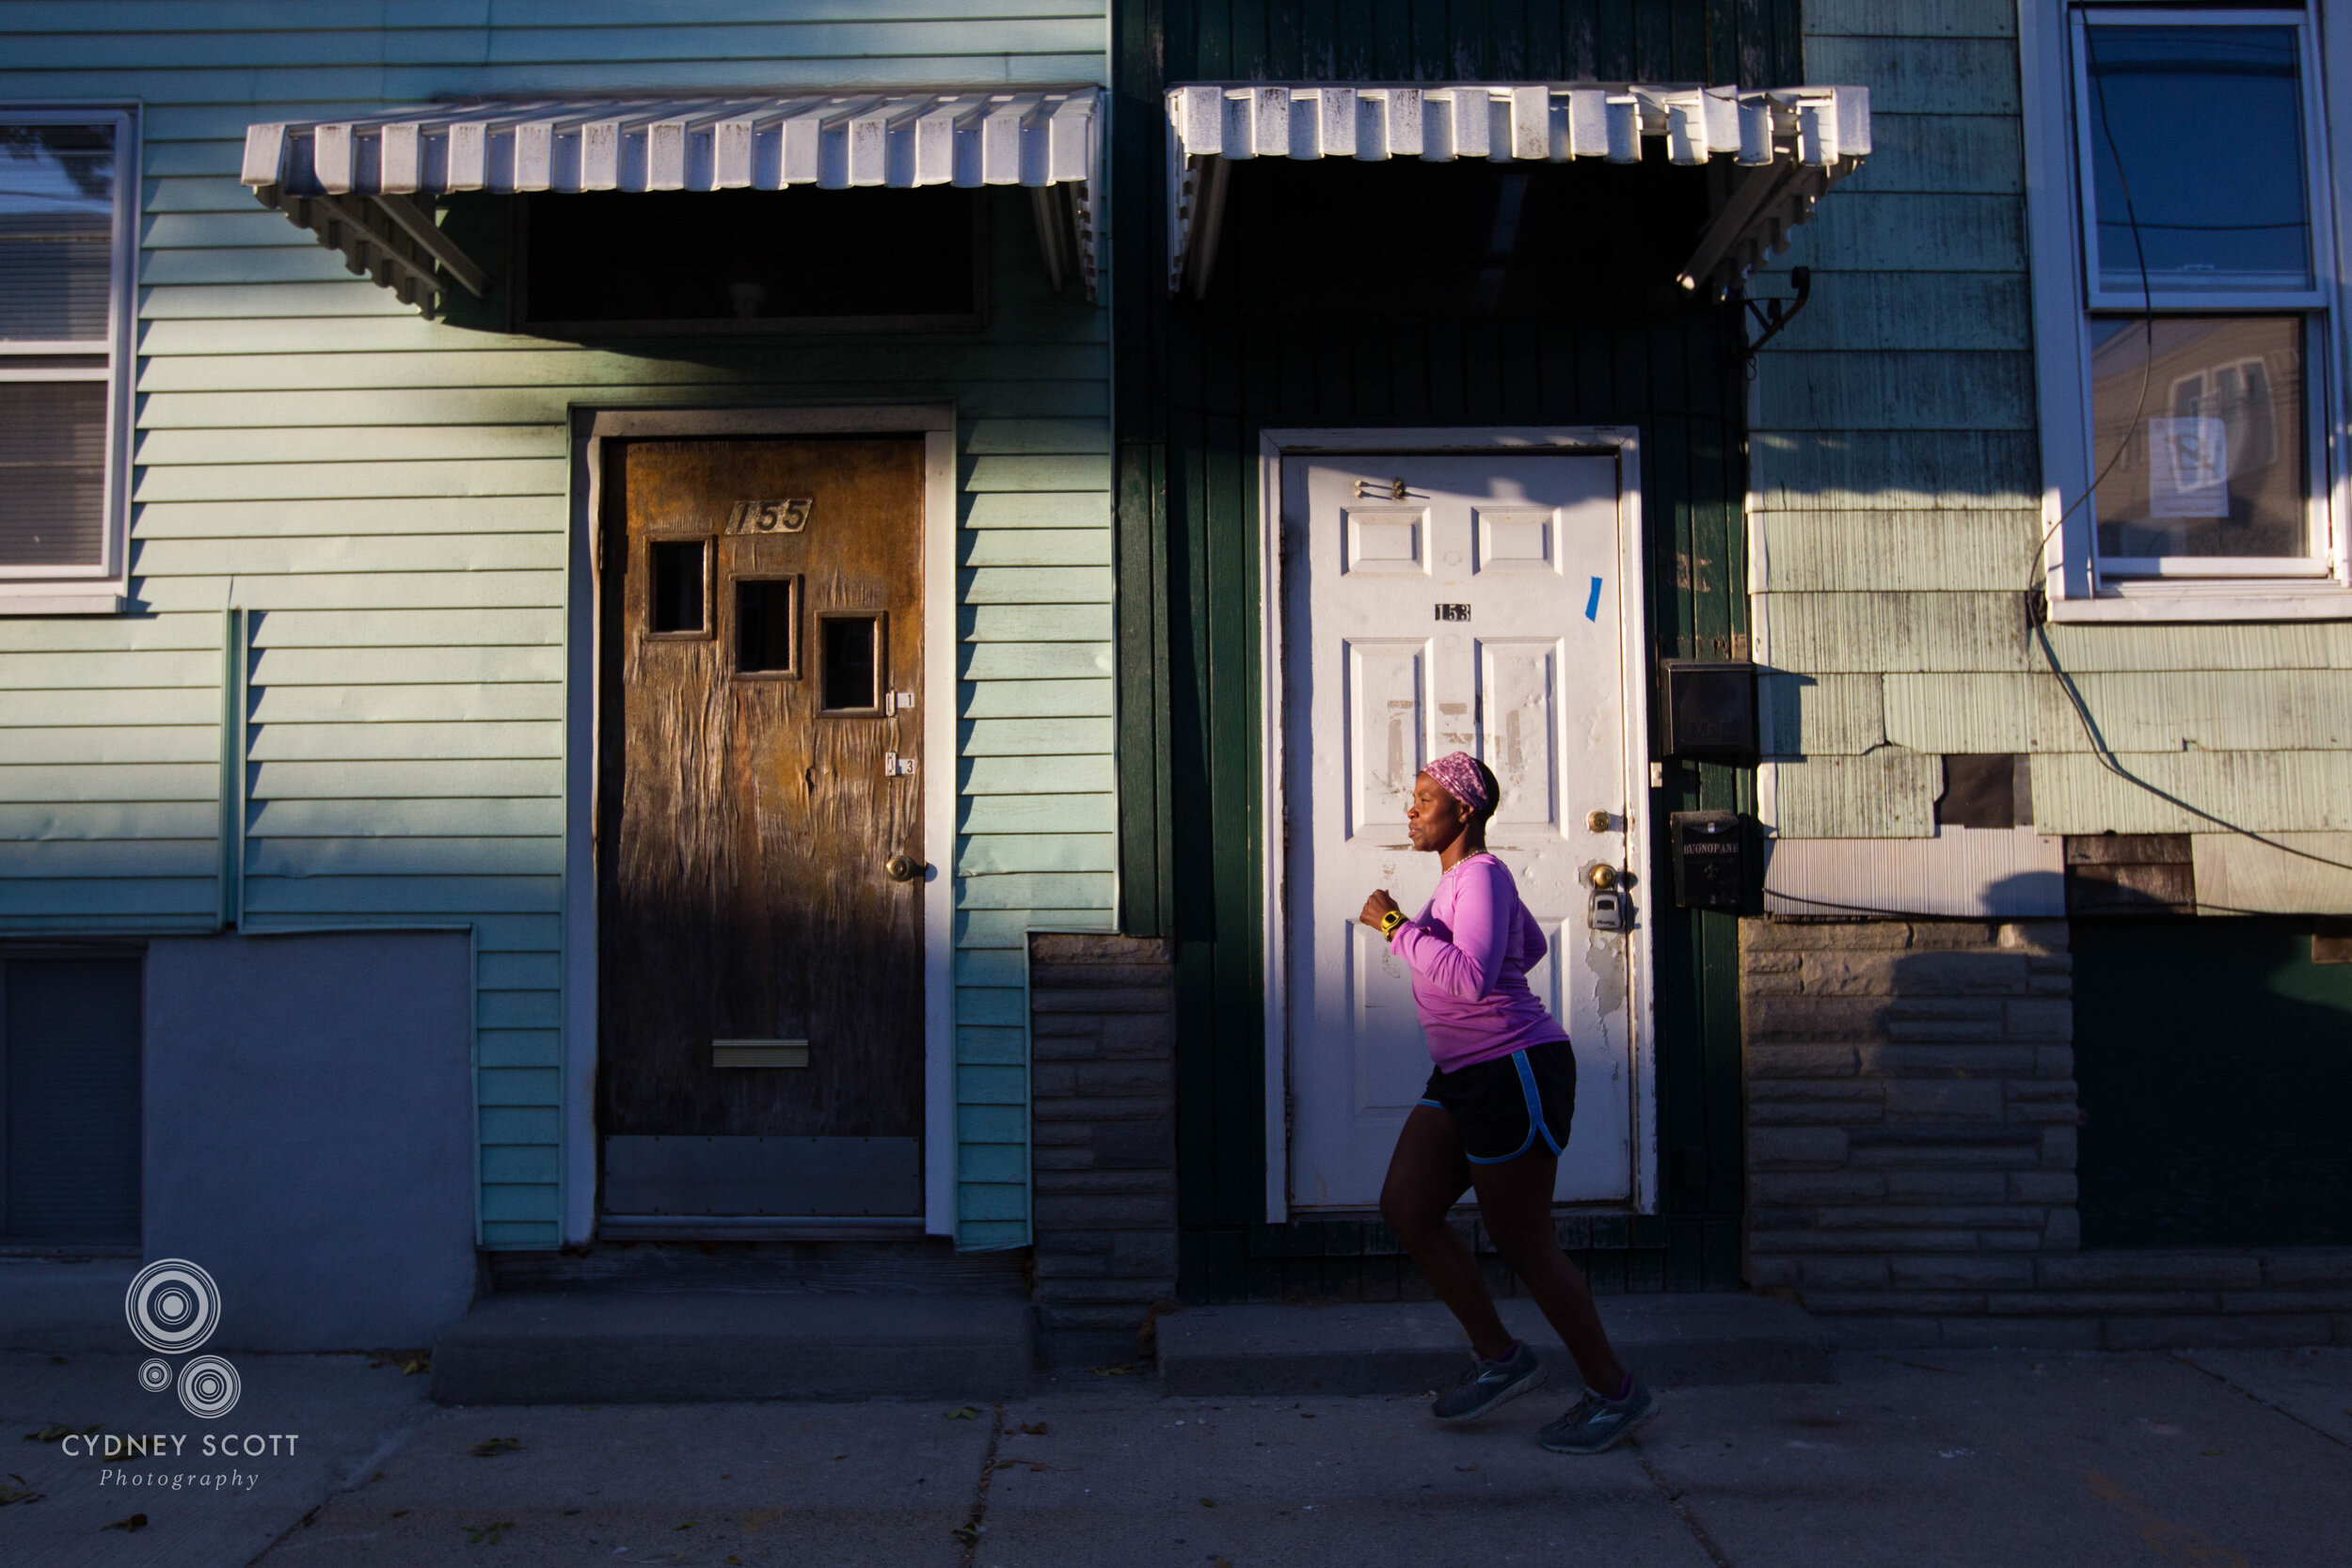
The first time I photographed Tiffany, I got up god-awful early for good light and we wandered her neighborhood in south Boston and found great spots to capture both her, and the beautiful place she run in.

A week of so later, I visited her at Salem State College and photographer her there too.

You can click here to read the story about Tiffany, an amazing woman, and here are some shots that didn’t run. One of my favorites is the one where I asked her to be all serious, standing in the sun, and she just couldn’t do it. What a smile!


Bring More Kiddos To Jump on the Beds!

I have always loved photographing people in their bedrooms. It’s not because I’m a weird snoop or constantly on the lookout for interior design inspiration. Bedrooms are a reflection of their owners, and can be their cozy sanctuary away from the rest of the world.

Often when I come into a client’s home, with the parents’ permission I’ll ask one of the kids to show me their room. Showing me around can help them feel important (which they are!), and showing me their favorite toys often helps a shy kid open up, so they feel less weird about their family session once we get going.

Shooting in bedrooms can give my clients a sense of ease and comfort, as well as a little time capsule to look back on in the years to come and remember how itty bitty their kids were, and what the space looked like when they were a young family together. As for the kids, I would love to have a photo of myself in my room as a kid - my soccer ball on the floor, The Bangles poster on the wall and my My Little Pony collection on display in all their rainbow glory. They are fun pictures to have in the future.

Here are some of my favorites through the years;

Post Those Photos in Real Life!

Happy New Year!

If one of your goals for this next decade includes finally getting your photos displayed in your home, this write up is for you!

One of the most exciting things to see when I return to clients’ homes for an annual shoot is photos from past sessions displayed on their walls or on tables in frames. In this fast-paced world it’s so easy to take those digital files and tuck them away and never get around to printing them and enjoying them.

A while back a friend of mine asked for help with laying out her photo wall. It was a lot of work, but I had a blast going through her photos, helping her choose which to go on the wall so that in the end, the story of her family ran the length of her staircase.

I thought I would share some pointers in case you wanted to take some photos from a session with me, and create a display with them. Of course, if you have the drive, you can take photos from your personal collection and apply these rules too, but for this example, I’ll use photo from all one shoot I had recently.


How to choose what goes on the wall

  1. Choose an anchor photo. The anchor photo is the largest photo, or one of the largest photos, and tends to be centered among all the other photos in your wall layout. It should be one of your favorites. In the example below, I chose two siblings having a moment.

  2. The goal is for your wall to tell a story. Avoid an entire wall of people looking straight out at the viewer and create visual interest by choosing photos with a variety of expressions, crops and compositions.

  3. Consider a photo that is a break from the expected but still contributes to the overall look. In this layout, the photo of the hands holding the pinecone accomplishes this.

  4. Make sure your subjects fill the frames differently. Don’t fill your wall with a bunch of full-body shots. Have some with medium crops (waist up), tight shots of faces, and looser shots that show the subjects within an environment that tells a story or adds to the overall effect of the collection.

layout-2.JPG

Layout and hanging directions;

What you’ll need -
brown craft paper (comes in a roll)
painter’s tape
frames in a variety of sizes
prints of your photos (they can be small 4x6s for the time being, and printed at home. They don’t even need to be in color.)
hanging supplies for when you are actually working on the wall.
toothpaste

  1. Gather up all the frames you want to use. In my home I prefer simple frames so the focus is on the images, but variety of styles can be can be great too.

  2. Do a search online for “photo wall layouts” or explore Pinterest using the same search words for layout inspiration. I found the layout I used in this entry HERE.

  3. Once you have your frames, lay them out on the floor in a rough layout of how you’d like them to be on the wall. I start with the largest frames, then balance the whole wall out by adding the smaller frames around them.

  4. Place the photos (remember, they can be just small quick prints at this stage) on the frames on the floor. When you’ve made a final decision of which photos you want in which frames, you’ll know how large each photo needs to be printed according to the frame it’s with. Consider taping the small photo to the glass of the frame for safe keeping once you’re sure you want it in that particular frame. Remember to print your photo to fit the size of the mat within in the frame, not the frame itself.

  5. Photograph the whole collection on the floor. Immediately email that photo to yourself.

  6. Slide the brown packing paper under each frame one at a time. Cut the brown paper to match the size of the frame and make a quick stick figure sketch of the corresponding photo onto the brown bag (or, just take a copy of the photo that’s on the frame and tape it to the brown cutout).

  7. Use those brown cutouts to then lay out the wall, using the photo you took of the frames for reference, and taping the brown rectangles to your wall with the painter’s tape.

  8. Move your brown paper placeholders around until they feel right on the wall, being careful to leave breathing room around the frames. Consider the height of the frames as well. Do you want to add more frames later? Is there room to do so? Will little ones be able to reach them where they are currently placed and is that a concern?

  9. To figure out exactly where to place the nail on the wall, dab a spot of toothpaste on the teeth of the frame hanger, and gently place the frame where it will ultimately go, leaving a toothpaste mark on the brown paper. You can then hammer the nail straight through the brown paper, right where the toothpaste is. Then simply removed the brown paper and replace it with a frame!

When I want to update my wall, I will often add photos to the frames currently hanging, leaving the previous photo behind the new one in the frame.

2019 Fall mini Sessions Wrap-Up

I recently held my annual Fall Mini Session Event. It was quite a day! When I arrived at Salem Willows Park I found that most of the trees in the large park had been damaged by the massive storm earlier in the week and the trees that still stood had not yet changed to striking New England fall colors as I had ordered. The nerve of Mother Nature! In addition to the End of The World appearance of the park there was some kind of video crew shooting in various spots, and a wedding being performed.

My clients, being the awesome folks they are, took it all in stride. We took advantage of the park’s beach and the lovely afternoon light resulted in some great shots. That and puppies. Pictures are always better with puppies.

Holiday Card Design Advice

One of my favorite things about the holiday season is when the cards start coming in. I hang the cards on my wall, and thanks to the popularity of photo cards, before long I have my own little gallery up. It’s great!

Here are some thoughts about what I personally think makes a holiday card really pop!

1. In my opinion, card recipients want to see a clear, beautiful portrait of you and your family/kids/dog, front and center. Make your photo the feature of your card by avoiding designs that take up half the card with sentiments. The sentiments are lovely, of course! but even better is your smile. If you do choose a more elaborate card, use very simple photos (like tight headshots) so that there are not competing design elements, creating a busy, un-peaceful mess.

2. If you’d like your family’s photo to be the featured photo, zoom in on the action - your faces! Sure, you may have gone to the beach this summer and want to share that news, but a beach shot where your family is tiny in the frame just doesn’t feature you the way your card-recipients want to see. Save a shot of your guys burying each other in the sand for the backside of the card, which will contribute to telling a little story about your year!

At right is the original crop, which I zoomed in on for the best effect on the card. When zooming in, be conscious not to crowd the subject by coming in too tight.

At right is the original crop, which I zoomed in on for the best effect on the card. When zooming in, be conscious not to crowd the subject by coming in too tight.

4. After you have a well-lit, nicely cropped shot of the whole family for the cover photo (or maybe just the kids, that’s cool too), use the back of the card to share photos that tell the story of your family. Avoid similar photos - four pictures of your kids from the waist-up smiling in the same manner is kind of boring. A shot of your daughter playing a game of soccer and another of your son engrossed in a project are more interesting, and for those who haven’t seen your kids in years or perhaps haven’t even met them, well, they’ve just learned something about your child! Also, if you’ve included a nice cover photo of the whole family looking into the camera, you don’t need a replica shot on the backside, so - go candid!

Screen Shot 2020-10-28 at 4.39.19 PM.png
Screen Shot 2020-10-28 at 4.39.13 PM.png

Do you like a card that’s more design-heavy? Consider a simpler photo, like the ones used in the below samples. Converting your photo to black and white can help avoid clashing colors too.

Screen Shot 2020-10-28 at 4.47.28 PM.png
Screen Shot 2020-10-28 at 4.49.28 PM.png

Click on the thumbnails below and roll your mouse over the opened photos to read more tips. Again, these are all made from shoots during my sessions, but I encourage you to add your favorite candid shots from the year to share with your recipients! (I used mpix.com to create these cards samples).

Happy designing!


We are FRamily!

When Lizzi got in touch with me to ask if she and her friends could hire me to do a fRamily (family made-up of friends) session, I was ALL IN! Five families, the parents all buddies from college, were bracing themselves to say goodbye to one of their families before they moved away.

The group hired me to do some big group shots, then we used the remaining time to get individual family shots, candids of the kids, some siblings pics, and any other group shots requested.

While I felt for them losing part of their group, it was such a great idea and I was so happy to be there to shoot some photos for this tight group of friends!


William and Avery

I’ve been photographing William and Avery every year since they were wee little ones. Brand new humans. I enjoy it every time. Sometimes the biggest challenge is finding a location that helps me and my clients get the best photos. I wants a place with lovely vistas and great backdrops, but not an environment that takes away from the people I’m photographing.

Many people like to go to the scenic mill in Sudbury, but I prefer this little spot down the street from it. On the two occasions I have been, there have been no one else there. Just like I like it!

William and Avery are now four (and a half, Avery will point out), and on this day they not only met me later in the day when the light was nice but the little people were more tired, but they’d also gone to a birthday party earlier in the day.

They are what I call troopers.

I’m really happy with the results. The light, the colors, the nice little moments. It was a good day.


Love and Music

John and Peter used to live in my parents’ neighborhood. I was always pleased to bump into them at weddings we were all working at, and at various community events. They moved to the countryside a little while ago, so I was happy to hear they’d won a bid on a photo shoot with me a while back at a local fundraiser before they moved. Now that I no longer shoot weddings and they have moved away, I do not see their friendly faces much at all anymore.

Since their auction win allowed them to use their session in any way they like, we created a smorgasbord photo session. II had a blast making a headshot for Peter who is a practitioner of Structural Integration, in addition to playing the violin, and a headshot for John who plays cello. The minute I saw their cool practice space, I knew I would need to shoot John a bit more extensively, and he obliged. And of course, we made use of the time to get awesome shots of the two of them together too!

Quite productive!


Calling All Seniors!

Years ago I had the pleasure of photographing Cait for her senior portraits. I had such a blast that I was left wondering why on Earth I wasn’t doing more senior portraits.

Since then I have failed to collect senior portrait clients. Mostly this is because I never think to promote my services during senior portrait season. Like now actually! Senior portrait season starts in the spring, and yet here I am promoting my services at the end of summer.

Smooth Cyd. Real smooth.

I love working with teens. They love to be photographed, take direction well, and bring ideas to the table. So, I hope I get to have more in front of my lens.

In the meantime, you can find more info about a deal I’m running until November 1. If you happen to know a junior or senior who might be interested, please let them know!

CLICK HERE TO READ MORE.

Johnson String Catalog

If you’ve visited my blog recently you may have already caught a glimpse of the shots I took for Johnson String Instrument . I wanted to share how those images got used in their annual catalog for 2019-20.

The catalog was designed by Pat Nieshoff Design, and you can see the full catalog HERE.

As always, click to enlarge the images.


Strings and Smiles {BOSTON AREA MARKETING PHOTOGRAPHER}

Just a sampling from a shoot I did recently for Johnson String Instrument annual catalog. Everybody was great to work with, as always. C, in the jeans top, was charming and has the most amazing skin! And E, in the red and white dress (and on the big comfy chair), I mean c’mon! How can you not smile when you see it’s clear that she loves to laugh? (Oh, and the grown-ups were fine to work with too )

And They're Off!

Last year I had the great pleasure of following the Boston University Dance Team through their competition season for picture story for BU Today. You can see the story here. I was in my happiest place when I was a fly on the wall documenting their hard work, their camaraderie, their challenges and triumphs. It was one of my favorite work things to happen last year.

Since then, I occasionally see some of the dancers on campus. I would give them a big hug and enjoy a quick chat before they rushed to their next class on campus.

When Nina contacted me at the end of this year asking if I would photograph some of dancers from last year who are now seniors, I was so excited to see them again and photograph them! This time was a bit different since they were not pushing their bodies to the limit perfecting dance routines (it was a bit more chill this time around), but I really loved being able to chat with them and hear about where they are headed next. We wandered campus photographing each grad in front of her college, did various group and single shots, and of course, got them stepping on the crest (which i recently learned we’ve been incorrectly referring to as a “seal” for many many years) - a BU superstition.

Congratulations, Terriers!

family Snowball fight! {boston family photographer}

Heather comes up with great photo shoot ideas for her family sessions. You can find a few shots from last year’s Family Photo session in the wrap up gallery, where her daughters Alana and Nadia are riding bikes in their pretty dresses and showing off their soccer ball skills - also in their dresses (which makes them young women after my own heart!).

A few weeks ago I got an email from Heather saying she had this idea about having the family session in the snow; shots of them sledding and having a snowball fight, etc. We would need to wing it a bit, we both agreed, since the session depended on weather. I was in!

Weather and scheduling worked in our favor and on Saturday I went to their place and had a ball watching them have a ball…while making snowballs.

The highlight for me was when we were setting up a shot of everyone throwing the snowball in my direction and Alana claimed “I have terrible aim!” then promptly nailed me right in the face. It was pretty much perfect!


Rowan is Here! {boston Family and baby photographer}

My friend Sheila had a baby! His name is Rowan and he is a delightful, adorable little peanut. Sheila and Steve’s first child, Meera, is super fun, and I learned at my New Year’s Eve party that she’s a My Little Pony fan so we’re pretty much BFFs now.

Sheila called me to do a newborn photography session and it turned into a family photo session, including a doting uncle and grandma too! Rowan is delightful and very loved and no doubt his big sister will teach him how to be mischievous in the best way possible!

As always, click on the block to enlarge!


Boston Family Holiday Sessions!

Tis the season for holiday photos! This weekend was no different. Both sessions took place in beautiful Boston. The first was Rachael along with her kids, and their cousins which made for a fun and super fashionable cute-fest. Next was Pam’s family who came dressed in their best. Even their pup Murphy was sporting a matching bandana!

The results were fun, charming, and a lovely nod to our beloved city!